Installing a Retractable Doggy Gate
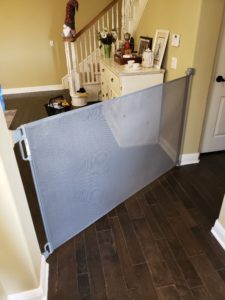
I recently came across an uncommon Doggy Gate installation,
The instuctions did not include a corner to corner installation,
The need to improvise was apparent!
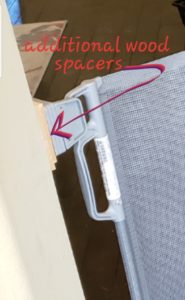
With this particular product, there were six spacers included,
The spacers allow one to fill the space on the top connector to compensate for the baseboard molding on the bottom,
The corners were round (bull nose) which made it slightly easier,
Either way, sharp or bull nose, it’s smart to pre-drill the holes,
The kit comes with templates that determine the exact placement of the connectors,
However,
There were not enough spacers to come out past the quarter round molding,
This is where the need to improvise came into play,
A large wood paint stirrer worked perfectly, (the kind you get with a 5 gallon bucket)
*Note…During the installation, keep checking the gate to make sure everything lines up,
I used 3 1/8″ GRK screws (star head)
I cut the paint stirrer into little pieces to fill in the additional space I needed and pre-drilled the holes so they wouldn’t crack,
I needed more space on one side (top receiver), to create enough tautness on the bottom,
if it’s not taut on the bottom, a little dog could potentially get underneath,
incidentally, the net gate needed to be installed above the quarter round molding,
On the receiver side of the gate, the holders needed to installed sideways with emough angle to create counter resistance,
At the end of the day, the application was complete and the “angled” doggy gate worked great!
- gojoehandyman.com


