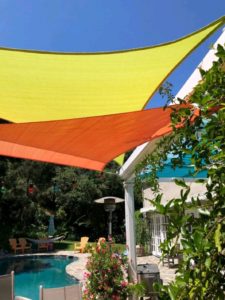
Hanging Shade Sails
A chic way to add shade without breaking the bank,
I recently had the pleasure of installing a few shade sails, for a previous client in her back yard.
The first step we took, was to plan what shape & size worked best and where to connect,
There are many size, shapes and colors to choose ftom, i.e.~~~ right angle and isosceles triangles, squares, etc., in many sizes and colors,
When planning our layout we decided on a 12’x12’x17′, right angle triangle and a 12’x12’x12′ isosceles triangle, and a square under the patio cover,
In order to connect our sail shades we needed to add a post, we used a pressure treated, 4×6, 11′ post and placed it in a 3 1/2 hole and angled it about 10 degrees away from the opposing connectors, the reason for this, is to add opposing resistance when tightening our turnbuckles,
We filled the hole 7 bags of concrete and let it cure over the weekend,
As for the hardware, we purchased two harware kits from Amazon which included carabiners, turbuckles and looped connectors to connect the carabiners turnbuckles and rope,
*Note…the hardware could also be purchased individually from Lowes or Home-Depot, giving more options to create more resistance, especially when it comes to the turnbuckles,
We connected two of the corners of our right angle triangle to the patio cover and the third corner to our post, we then added a little extension about 18″ lower than our post connection to connect one of the corners of our isosceles triangle, creating multiple layers, adding to the chicness of our sails, we connected the other two corners of our isosceles triangle in a offset location on our patio cover,
We used the provided rope and turbuckles to tighten our sails and wallah, we had a chic design without breaking the bank,
By adding shade, we made our outdoor space much more enjoyable!
gojoehandyman.com
